Obtaining a Monsoon Account
To obtain an account on Monsoon, you must either be faculty, or a student being sponsored by a faculty conducting research at NAU. Contingent upon administrative approval, NAU affiliates may also obtain a Monsoon account.
Before proceeding with the account creation process, read the policies for using Monsoon.
Account Creation Process
Our account creation process consists of a couple of steps, which are normally pretty painless!
Firstly, you’ll want to request an HPC account. The form can be picky about the browser that is viewing it, so please ensure you are using a modern supported browser. While filling out the form you must specify a faculty sponsor; this sponsor will need to approve this request.
- Faculty are not be required to specify a sponsor
- NAU affiliates need a type of affiliate account that includes an NAU domain account. Collaborative Campus Associate is generally suggested.
Once the form has been approved, Monsoon staff will create a provisional account, usually within 24 hours. (Affiliate accounts will take additional time to progress through the process due to them requiring CIO approval.) When the account is created, a welcome email will be sent to your primary NAU email address, and you’ll have two weeks to validate your account through the self-paced workshop process.
Self-paced Workshop Process
After the provisional account has been created, you will have two weeks to validate your account by completing our introductory orientation training.
- NAU’s AnyConnect VPN: required to access both Monsoon, and workshop media, from off-campus.
- Review the introductory workshop media and complete the four exercises.
- Slides: Our primary workshop resource. [PDF; required]
- Zoom workshop recording: A recording of recent “live” workshop (Note: onscreen annotations to communicate recent changes since that workshop). [MP4; supplementary]
- OnDemand web-portal walk-through video: A walk-through of the features of the OnDemand portal. [MP4; supplementary]
- Familiarize yourself with our interactive support options and their schedules:
- weekly Zoom-based office hours
- monthly in-person “coffee hours”
- semi-monthly topical workshops
- Validate your account so that it doesn’t expire, using the output generated by the workshop exercises. The validation process is explained in the next section.
Code Validation
Because the introductory workshop is now fully self-guided, a user is able to immediately self-validate their account upon completion of the required exercises.
To access the validation binary, and complete the validation you will need to execute the confirm_user command (which is part of the workshop module) and paste in the individual codes obtained from the exercises, as demonstrated here:
$ module load workshop
$ confirm_user
username: abc123
exercise 1 code: 104b0c020063c4b666c376480260f14c
exercise 2 code: b542e82782e8af2663f243d39ec1751c
exercise 4 code: 0659f7fc71a24040c54e8a69c55a38bc
You've successfully confirmed your account!
Press Enter to Exit
Account Expiration
Your HPC account will be disabled when you no longer have an active affiliation with NAU. This includes losing student, employee, or affiliate status. Your HPC account data will be retained for 6 months after losing affiliation with NAU.
Connecting to Monsoon
There are two main methods to connect to Monsoon that we support.
The primary Monsoon interface is through text-based command-line interface, available through any program that uses the SSH protocol.
Command-line interfaces can be especially daunting for novice users, but they can also be extremely powerful; for this reason, we also offer a web-portal that lends a more-familiar graphical-interface to many of the most common tools and features needed to utilize Monsoon.
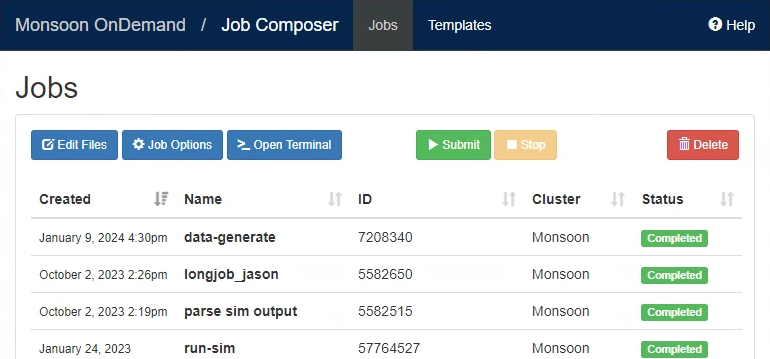
Connecting via the OnDemand Web-Portal
The OnDemand Web-Portal progides a graphical user interface (GUI) to access Monsoon. This is great if you are not very familiar with using a terminal, but still need to access Monsoon.
Connecting via Command-Line SSH
The primary mechanism for connecting to Monsoon, submitting work, monitoring progress, and retrieving results via a terminal is the Secure Shell Protocol (SSH), a terminal-based application that allows you to remotely access Monsoon securely.
One of the benefits of using Monsoon is that you don’t have to remember a separate username and password for Monsoon as your Monsoon credentials are the same as your NAU credentials. If you don’t know what those are, please contact ITS.
Note: If you are not connected to the NAU WiFi, you must use the NAU VPN in order to access Monsoon.
Opening a Terminal
The method of opening a terminal will vary depending on your operating system.
Windows
In recent years, Microsoft has been developing an application called Windows Terminal to bring a feature-rich terminal to Windows. Modern versions of Windows come with Windows Terminal pre-installed. If you do not have Windows Terminal installed or if you are unsure if it is installed on your system, you can download the program from the Microsoft Store.
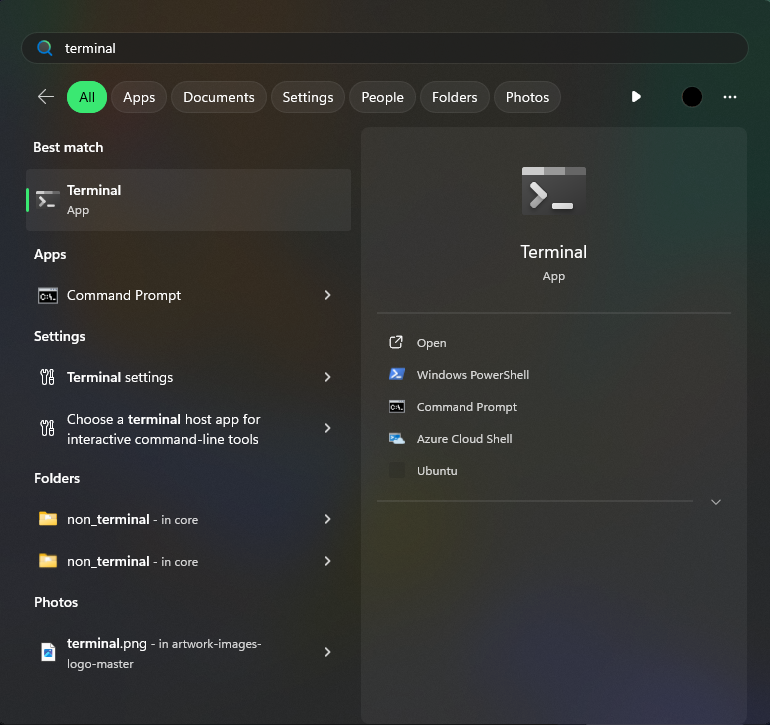
Opening Windows Terminal
To open the Windows Terminal, press the Windows or Start key on your keyboard (looks like a square made up of four squares), type “Terminal”, and press Enter on your keyboard.
For more information on how to use the Windows Terminal, you can visit Microsoft’s documentation page.
Mac
On Mac OS, Apple provides a build-in terminal application called Terminal. To open this application, open Launchpad and click on the icon labeled “Terminal”.
For more information on how to use the Terminal application on Mac OS, you can visit Apple’s Terminal User Guide.
Linux
Since you are using Linux, you are likely already familiar with the command-line interface and how to find it. Regardless, opening a terminal in Linux will vary depending on your desktop environment (Gnome, KDE, etc.).
For most major desktop environments, you can hit your Super key (sometimes referred to as the Windows or Start key) and type “Terminal”, and your list of terminals should show up.
Starting an SSH Connection
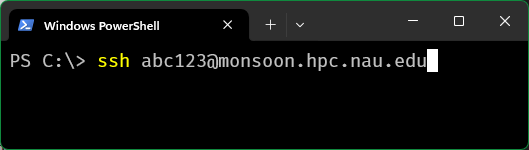
In Windows, Mac, and Linux, connecting to Monsoon is as simple as opening a terminal and using the ssh command to connect to monsoon:
ssh [UID]@monsoon.hpc.nau.edu
For example, someone with the NAU User ID of abc123 would connect to Monsoon using the command:
ssh abc123@monsoon.hpc.nau.edu
Note: If you are a classroom Monsoon user, you MUST replace monsoon with rain.
When you’re first logging into a remote server using SSH, as an extra step of precaution, the client displays the following message: “the authenticity of the host cannot be established” to ensure that the remote server you are connecting to is correct. If this shows in your terminal, you can type “yes” and hit enter to continue.
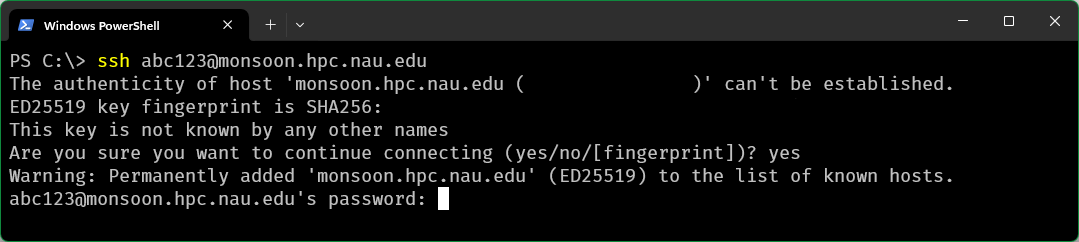
Once you are prompted with entering a password, enter your NAU password.
Note: When typing your password, you will not receive visual feedback of what characters you entered.
Next Steps
If you’re unfamiliar with how to use a Linux system, you may next want to visit our Linux/Bash Basics page.
If you need access to GUI applications on Monsoon, check to see if your program is available in OnDemand as an interactive app. If your app is not available, read our article on how to set up X11 forwarding.
Submitting Your First Job
In order to submit work to the cluster we must first put together a job script which tells Slurm what resources you require for your application. In addition to resources, we need to tell Slurm what command or application to run.
A SLURM job script is a bash shell script with special comments starting with #SBATCH. View example job scripts in /common/contrib/examples/job_scripts.
$ cat /common/contrib/examples/job_scripts/simplejob.sh
#!/bin/bash
# the name of your job
#SBATCH --job-name=test
# this is the file your ourput and errors go to
#SBATCH --output=/scratch/nauid/output.txt
# 20 min, this is the MAX time your job will run
#SBATCH --time=20:00
# your work directory
#SBATCH --workdir=/scratch/nauid
# change this ater you determine your process is sane

echo "Sleeping fof 30 seconds..."
sleep 30
echo "All refreshed now!"
Take note of the first line of the script:
#!/bin/bash
This line signifies that this file is a bash script As you might already know, any line in a bash script that begins with a # is a comment and is therefore disregarded when the script is running.
However, in this context, any line that begins with #SBATCH is actually a meta-command to the “Slurm” scheduler that informs it how to prioritize, schedule, and place your job. The -–time command allows you to give SLURM a maximum amount of time that your job will be allowed to run. This is very important for scheduling your jobs efficiently because the shorter the time you provide, the sooner your job will start.
The last three lines are the “payload” (the work being done). In this case our job is simply printing a message, sleeping for 30 seconds (pretending to do something) and then coming back from sleep and printing a final message.
Now lets submit the job to the cluster:
$ sbatch simplejob.sh
Submitted batch job 138405
Slurm responds back by providing you a job number 138405. You can use this job number to monitor your jobs progress.
Lets look for job 138405 in the queue:
[abc123@wind ~ ]$ squeue
 JOBID PARTITION  NAME   USER ST  TIME  NODES NODELIST(REASON)
138405      core  test abc123  R  0:05      1             wind
We can see that our job is in the running state residing in the all queue with the work being done on the node: wind. Now that the job is running we can inspect its output by viewing the output file that we specified in our job script /scratch/nauid/output.txt.
$ cat /scratch/nauid/output.txt
Sleeping for 30 seconds ...
All refreshed now
Great, the output that normally would have been printed to the screen has been captured in the output file that we specified in our jobscript.
Using the Monsoon Cluster: Introduction
We use a piece of software called Slurm for resource management and scheduling. Job priorities are determined by a number of factors, fairshare (most predominant) as well as age, partition, and size of the job.
A Slurm cheat sheet is available if you have used Slurm before.
Viewing the Cluster Status
While logged in to one of Monsoon’s login nodes (wind or rain), you can inspect the state of the queues with the squeue command:
$ squeue
   JOBID PARTITION     NAME   USER ST        TIME NODES NODELIST(REASON)
12345678      core demo_job def456 PD        0:00     1      (Resources)
18765433      core demo_job ghi789 PD        0:00     1       (Priority)
12398234      core demo_job jkl987  R 12-20:14:42     1              cn4
By default squeue lists both the running R and the pending queue PD. The jobs with an R in the ST column are in the running state. The jobs with a PD in the ST column are in the pending state.
The TIME column lists how long the job has been running. You can see that there is one job that has been running for almost 13 days.
It might appear that the cluster’s resources are mostly all allocated since there are jobs in the pending state, but this is not necessarily the case. It could be that the jobs in the PD state are asking for more resources than are available on the cluster. To find out more info about the cluster state, use the sinfo command.
$ sinfo
PARTITION AVAIL   TIMELIMIT  NODES  STATE NODELIST
core         up  14-00:00:0      7    mix cn[4,7-8,11-14]
core         up  14-00:00:0      7    all cn[1-3,5-6,9-10,15]
This shows the partition of nodes defined in slurm, of which there is only one: core. Note that we can see that there are free cores (cpus) available as there are nodes in the mix state. Nodes in the mix state only have some of their cores currently allocated, whereas nodes that have all cores allocated will be in the alloc state.
FAQs
Why is my job pending?
Most of the time, questions that we get about the cluster related to why jobs are not starting (in the pending or PD state). There are often many different contributing factors to this.
When jobs remain pending for long periods of time, you can see why by running the squeue command. The reason slurm has declared your job to be pending will be listed in parentheses under the REASON column. For example, if user abc123 wanting to see all jobs that were pending, he would enter
squeue -u abc123 -s PD
The following questions on this page explain what these different reasons are and how you can avoid them in the future.
Dependency
This occurs when a job “depends on” another being completed before it is allowed to start. This will only happen if a dependency is specified inside the job script using the ––dependency option (see Dependent Jobs).
DependencyNeverSatisfied
This occurs when a job that must run first in a dependency fails. This usually means that there was an error of some kind that caused SLURM to cancel the job. When this happens, any jobs that depend on the failed job will never be allowed to run.
ReqNodeNotAvail
This occurs when a requested node is either down, or there is currently a reservation in place for it. If you have requested a specific node in your job script using the ––nodelist command, try removing this option in order to speed your job along. Slurm is very good at allocating resources, so it is often best to let it decide which nodes and processors to use in order to run your job.
To see if the node you requested is down, run
sinfo -N -l
AssocGrpCPURunMinsLimit/AssocGrpMemRunMinsLimit
This occurs when either the associated account or QOS that you belong to is currently using all available CPU minutes or MEM minutes it has been allotted. Read more about Monsoon’s GrpCPURunMinsLimit.
Resources
This occurs when any resources that you have requested are not currently available. This could refer to memory, processors, gpus, or nodes. For example, if you have requested the use of 20 processors and 10 nodes, and there is currently a high volume of jobs being run, it is likely that your job will remain in the pending state due to “Resources” for a long time.
Priority
This occurs when there are jobs ahead of yours that have a higher priority. Not to worry, you can help alleviate this issue by updating your job time limit to a lower estimate (See the man page for the scontrol command). For example, if you have put ––time=1-00:00:00 in your script, Slurm will set your time limit to one day. If you know your job will not take longer than four hours, you can set this number accordingly and Slurm will give you a higher priority due to the lower time limit. This is because we have the backfill option turned on in Slurm which will enable small jobs (lower time limit) to fill the unused small time windows.
JobHeld/admin
This occurs when your job is being held by the administrator for some reason. Email ask-arc@nau.edu to find out why.
Expedite your job’s start time
Sometimes jobs will remain in the pending state indefinitely due to certain settings in the job script. Here is a list of things you can do to ensure that your job gets going:
- Give your script a lower time limit (if at all possible).
- If you know the job will take a long time, try breaking it up into several different scripts that can be run separately and with shorter time limits. Consider job arrays for this. Also, the dependency option allows you to be sure that one job runs before another.
- Don’t request specific nodes.
- Don’t request more memory than you need.
- Don’t request more cpus than you are launching tasks, or threads for.
- Avoid using the
––contiguousor––exclusiveoptions, as these will limit which nodes your job can run on.
Requesting more memory
Requesting a specific amount of memory in your script can be done using the ––mem option. This amount is in megabytes (1000 MB is 1 GB). If you wanted 150 GB of memory, just multiply that number by 1000 to get the amount in MB. The example below shows the line on your script that you would add if you wanted to allocate 150 gigabytes of memory:
#SBATCH ––mem=150000
Requesting more CPUs
If you would like your job to use a certain number of cpus, you may request this using the ––cpus-per-task option. For example, if you would like each task in your script (each instance of srun you have) to use 3 cpus, you would add the following line to the script:
#SBATCH ––cpus-per-task=3
Requesting the GPU
Please refer to our documentation page GPUs on Monsoon to learn how to request GPUs.
GPU availability
Please refer to our documentation page GPUs on Monsoon to learn how to view GPU availability.
Job resources
You can determine the efficiency of your jobs with the jobstats utility. Running jobstats without any flags will return all your jobs of the previous 24 hours. To see older jobs, add the -S flag followed by a date in the format YYYY-MM-DD. Example: jobstats -S 2019-01-01.
Here is some sample output of running jobstats:
ID       JobName      ReqMem    MaxRSS   UserCPU     Timelimit    Elapsed    State       JobEff
================================================================================================
94004    mod_test     0.98G     0.0M     00:00.090   00:01.00     00:00:02   COMPLETED   1.12
Your efficiency is calculated with a variety of factors, including the number of CPUs you use, how long your job runs, and your memory usage.
Additional options are available. Use jobstats -h to see all available options.
Creating and Managing an Enterprise Group
Enterprise Groups are a method used by HPC/ARSA to manage who has access to specific folders on the cluster. In regards to project areas on Monsoon, it will allow you as the data manager for your project, to assign who on the cluster has access to your data repository. That way, you can add or remove access at your will and not have to wait for us to add and remove people for you. This assumes that people you add have a monsoon account.
Currently, Enterprise Groups are managed by end-users through the Directory Services tab at my-old.nau.edu. To learn how to create and manage Enterprise Groups, please read the official NAU documentation on Enterprise Groups.
Licensing
Licenses can be requested like any other resource in your SLURM scripts using #SBATCH ––licenses:<program>:<# of licenses>. Read the documentation on licensing for more information.
Keep commands running after disconnecting SSH
Monsoon users can use the screen command to keep commands running even after closing their terminal session/SSH client, as long as they run screen first.
- Start a command-line shell on one of Monsoon’s login nodes
- Start a screen session by running the
screencommand - Initiate the desired programs/processes
- Optionally close the window/exit the SSH client
(screen is also used as a safeguard against unstable network communications)
To re-connect to a closed/lost screen session:
-
Ensure you are logged in to the same system
(e.g.:
wind,rain,dtn1,ondemand) -
Run
screen -r
For more in-depth information on using screen, please see our Using the ‘screen’ command page.
Configuring/moving where Anaconda keeps its data
By default, Anaconda (or “conda”) stores the data for all environments you create in your home directory, in /home/abc123/.conda which could potentially create a quota issue if a user creates large or numerous environments. If your 10G home quota does not suffice, we can discuss expanding it to 20G. Often, however, a better workaround is to simply tell Anaconda to use your /scratch area instead of your /home area.
(Note that unix/linux systems treat files/directories that start with a period as “hidden” and often require something like an extra command flag to display them. For example, ls -l ~/ will not list your .conda directory, but ls -la ~/ will list it, and other “hidden” files.)
To begin, start by first setting up your session such that you will be able to successfully interact with and pull information from your environment
module load anaconda3
If you have a particularly complex environment put together, or otherwise wish to make sure you have a backup set up before attempting to move where data is stored, you may first execute the following commands, in which myenv is replaced by the name of your environment:
conda activate myenv
conda env export > myenv.yml
conda deactivate
Regardless of whether or not you perform this backup, if you already have established conda environments that you wish to keep, you will have to export the existing data into a text file, such that you may later copy it over to the new location in your scratch area (If you have more than one environment that you are wishing to move, export each of your environments to their own files):
conda activate myenv
conda list --explicit > env-file.txt
conda deactivate
Next, using the text-editor of your choice, carefully add the following lines to the top of your ~/.condarc file, replacing abc123 with your own user ID:
envs_dirs:
  - /scratch/abc123/conda/envs

pkgs_dirs:
  - /scratch/abc123/conda/pkgs
Following this, the next step will be to create the new copies of your environments using the conda toolset. If, as stated earlier, you have more than one environment, repeat this step with each of the environment text files. At this time, if you wish, you may also opt to rename your environments by changing the term after the --name flag:
conda create --name myenv --file spec-file.txt
Now, conda environments and packages will continue be accessed/stored at /scratch/abc123/conda/. From here, all that is left to do is to delete the old conda files from the location that is no longer in use:
rm -r ~/.conda
And you should now be able to fully utilize your conda environments working from the /scratch directory
Managing and utilizing Python environments on Monsoon
We utilize the Anaconda Python distribution on Monsoon. If you’d like to create a Python environment in your home to install your own packages outside of what is already provided by the distribution, do the following:
module load anacondaconda create -n tensorflow_env tensorflow(wheretensorflow_envis your environment name, and tensorflow is the package to be installed into your new environment)conda activate tensorflow_env
With the environment activated, you can install packages locally into this environment via conda, or pip.
Example:
#!/bin/bash
#SBATCH ––job-name=pt\_test
#SBATCH ––workdir=/scratch/abc123/tf\_test/output
#SBATCH ––output=/scratch/abc123/tf\_test/output/logs/test.log
#SBATCH ––time=20:00

module load anaconda/latest
srun .conda/envs/tensorflow\_env/bin/python test\_tensorflow.py
Parallelism
Many programs on Monsoon are written to make use of parallelization, either in the form of threading, MPI, or both. To check what type of parallelization an application supports, you can look at the libraries it was compiled with. First, find where you app is located using the which command. Then run ldd /path/to/my/app. A list of libraries will be printed out. If you see libpthread or libgomp, then it is likely that your software is capable of multi-threading (shared memory). Please read our segment on shared-memory parallelism for more info on setting up your Slurm script.
If you see libmpi* listed, then it is likely that your software is capable of MPI (distributed memory). Please read our segment on distributed-memory parallelism for more info on setting up your Slurm job script.
Running X11 Jobs on Monsoon
Some programs run on the cluster will be more convenient to run and debug with a GUI. Due to this, the Monsoon cluster supports forwarding X11 windows over your ssh session.
Running X-Forwarding
Enable X-forwarding to your local machine is fairly straightforward.
Mac/Linux
When connecting to monsoon using SSH, add the -Y flag
ssh abc123@monsoon.hpc.nau.edu -Y
Windows
On PuTTY, in the left menu navigate to SSH->X11 and check Enable X11 forwarding
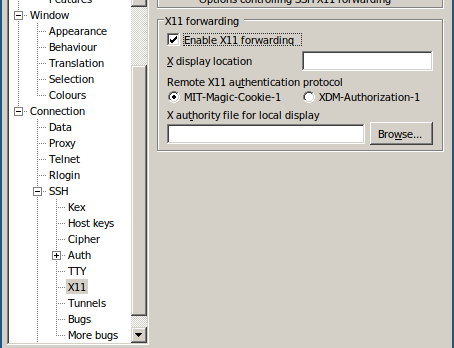
After connecting to Monsoon, running the GUI program with srun will create your window.
srun xeyes
For some programs, such as matlab, in order to ensure the window appears, add the ––pty flag to srun.
module load matlab
srun ––pty -t 5:00 ––mem=2000 matlab  # Start an interactive matlab session
Restoring Deleted Files
What if I delete a file that I need?
Snapshot of all home user directories are taken twice a day. What this means is if you accidentally delete a file from your home directory that you need back, if it was created before a snapshot window, you will be able to restore that file. If you do an ls of the snapshot directory (ls /home/.snapshot), you may see something like the following:
@GMT-2019.02.09-05.00.01 @GMT-2019.02.10-18.00.01 @GMT-2019.02.12-05.00.01 latest
@GMT-2019.02.09-18.00.02 @GMT-2019.02.11-05.00.01 @GMT-2019.02.12-18.00.01
@GMT-2019.02.10-05.00.01 @GMT-2019.02.11-18.00.01 @GMT-2019.02.13-05.00.01
Each of the directories starting with @GMT are a backup. if my userid is ricky I can check my files like the following:
ls -la /home/.snapshot/@GMT-2019.02.12-18.00.01/ricky
If I know I had my file before 6pm on the 12th. I would see all of the files that I had at the time of the snapshot. If there were a file called dask_test.py that I needed to restore from that snapshot, I could type in the following:
cp /home/.snapshot/@GMT-2019.02.12-18.00.01/ricky/dask_test.py /home/ricky
Your file would then be restored.
Requesting Certain Node Generations
Monsoon has four generations of nodes ordered by age (oldest first):
- Sandy Bridge Xeon, 4 socket, 8 core per socket, 2.20GHz, 384GB mem # request with
#SBATCH -C sb - Haswell Xeon, 2 socket, 12 core per socket, 2.50GHz, 128GB mem # request with
#SBATCH -C hw - Broadwell Xeon, 2 socket, 14 core per socket, 2.40GHz, 128GB mem # request with
#SBATCH -C bw - Skylake Xeon, 2 socket, 14 core per socket, 2.60GHz, 196GB mem # request with
#SBATCH -C sl
To select a certain generation, just put #SBATCH -C <generation> in the job. For instance to have a job run on Broadwell nodes only:
#!/bin/bash
#SBATCH ––job-name=myjob                    # job name
#SBATCH ––output=/scratch/abc123/output.txt # job output
#SBATCH ––time=6:00
#SBATCH ––workdir=/scratch/abc123           # work directory
#SBATCH ––mem=1000                          # 2GB of memory
#SBATCH -C bw              # select the Broadwell generation

# load a module, for example
module load python/2.7.5

# run your application, precede the application command with srun
# a couple example applications ...
srun date
srun sleep 30
srun date
How to request specific model of GPU
Please refer to our documentation page GPUs on Monsoon to learn how to request specific GPU models.
RStudio Missing Project Folder
/project areas are not available when running through RStudio due to our automounting of projects. To resolve this, please create a ~/.Rprofile file, if not already created, and append the following to it:
system(“echo ‘Ensuring my project directory is mounted …'”)
system(“ls /projects/<insert proj name>/PROJ\_DETAILS”)
The echo is optional.
Now when R or RStudio starts, the project folder will be mounted, and available.
Support for rgdal
Often researchers utilizing R, and geospatial tools will lean on a package called rgdal. In order to utilize rgdal on monsoon, a number of external software packages must first be made available to R both for the initial rgdal installation, as well as for subsequent usage.
We have prepared a full explanation of the process on our HPC forum, here: How do I install/use the ‘rgdal’ package for R on Monsoon?
Similarly, a more generalized explanation of how to use R modules with Monsoon is here: What is the preferred way to install R packages/libraries on Monsoon?
Using conda environments in the ondemand jupyter app
The jupyter app for ondemand automatically looks for any conda environments you may have installed on monsoon. If any of these environments has python and ipykernel, then the app loads them up and you can select them as a kernel named *-conda-env. This gives you access to specialized python modules that are not in the base environment, like BeautifulSoup for example.
Here’s how you can select a kernel on the home screen on juptyer:
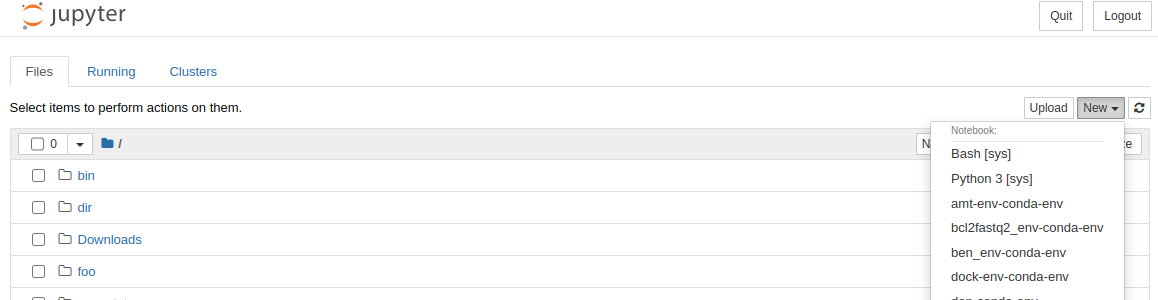
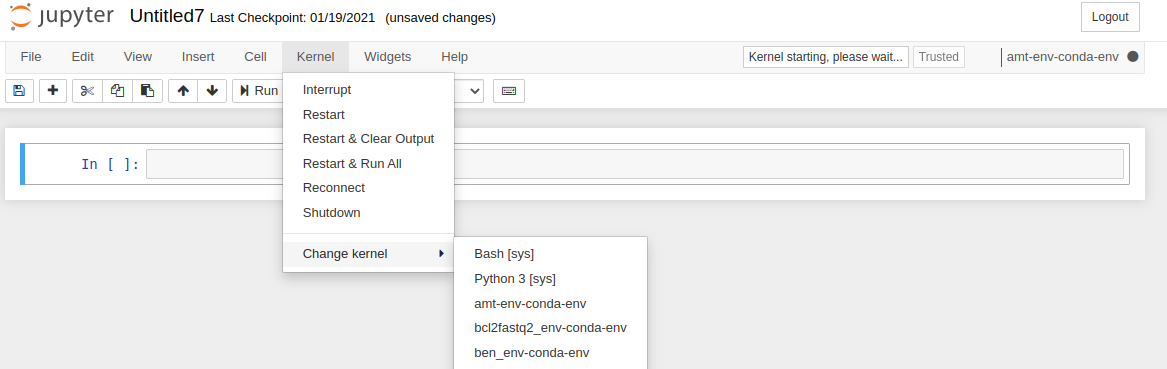
Or from within a notebook:
Here’s how you can install the ipykernel package in your conda env (replace myenv with your conda environment name):
module load anaconda3
conda activate myenv
conda install ipykernel
If the conda install is successful you should be able to load ipykernel without error like this:
python3 -c 'import ipykernel'
And there will be a jupyter-kernelspec executable in the environment:
# if this command prints out a path different from your environment's /bin
# then jupyter won't see it
# this would be from an error with the ipykernel install for your conda env
which jupyter-kernelspec
If you are still using python2 then you may have to install backports like this:
conda install backports.functools_lru_cache
conda stuck on solving env
A common issue with conda is when a conda install command gets stuck on “Solving environment”. This means that conda is looking through the conda channels for the packages to install (conda channels are like repos, they stand for web addresses that conda’s API uses to search for packages). Each conda install is broadly a two step process:
- Solving the environment
- Downloading prebuilt package files
There is no indication of how long the solving environment process can take, and for packages with a complex set of dependencies, it can take an excessive 10+ minutes.
$ conda install -c syanco r-amt
Collecting package metadata (current_repodata.json): done
Solving environment: failed with initial frozen solve. Retrying with flexible solve.
Solving environment: failed with repodata from current_repodata.json, will retry with next repodata source.
Collecting package metadata (repodata.json): /
There are a few conda arguments you can set to try to improve the speed of conda. But to save time, first determine if you need to go through this process, if you want to make an exact copy of a conda env you can export it and import it instead. The export step creates a file with a list of URLs so conda doesn’t need to spend any time scanning package lists for compatible dependencies (see this official documentation page).
Helpful arguments:
-c <channels>- Adds a channel from which to search for the package
- By default you should have the
defaultandconda-forgechannels defined in your~/.condarc - You should always specify this option, can speed up conda when used with the
–-override-channelsoption
-–override-channels- ignores any channels from your
~/.condarc, must be combined with the-coption
- ignores any channels from your
-–strict-channel-priority- tells conda to not search in the next channel once a package match is found in a higher priority channel
- most impact of these options
For example, this command was able to install the r-amt package in a few minutes instead of getting indeterminably stuck.
conda install --strict-channel-priority -c syanco r-amt
The conda environment installation process is not efficient and there seems to be little interest from the maintainers in improving this since they see installation as a one-time setup step for most users.
For more information refer to the online documentation or run this command on monsoon:
conda install --help
Linux/Bash basics
What follows is a quick primer on the basics of getting around in Linux with the bash shell. This section may not be needed by experienced *nix folk. If that’s the case, skip to the Software section.
Getting around
Editing files
There are a few editors available on Monsoon:
- nano – great for beginners
- emacs – very good editor, flexible
- vim – very powerful and flexible, a bit of a learning curve
File redirection and pipes
Examples
Linux Resources
Monsoon operates on a Red Hat Linux environment. Thankfully, the many variations and flavors of Linux are mostly the same when it comes to user interaction.
With that in mind, here are some free resources we recommend for getting extra familiar with Monsoon’s environment: